Wow Your Guests with Halloween Lanterns: A fun and easy way to decorate for Halloween

If you’re planning a Halloween party and are looking for quick decorating ideas, we’ve got you covered. Decorating for Halloween doesn’t have to mean hours spent carving pumpkins. Here’s a fun décor idea that takes minutes to execute and delivers tons of wow factor with zero carving. This lantern display is colorful, playful, and creates a "boo"-tiful focal point. It would also look terrific in an entryway to welcome guests, in a powder room, or in any room around the house that needs a touch of Halloween for guests to enjoy.
 What you’ll need:
 What you’ll need:
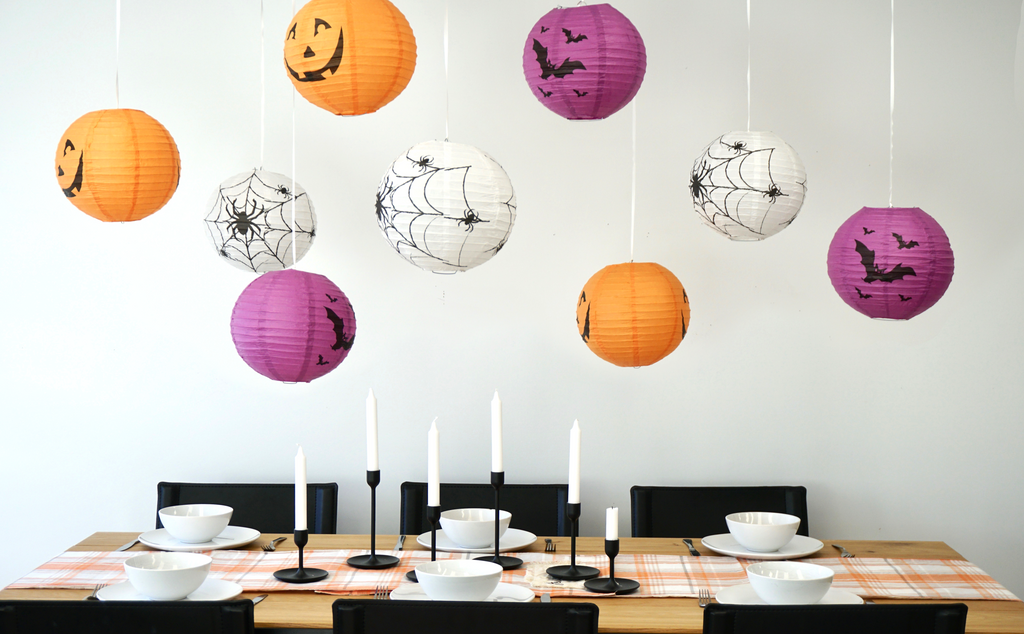
- Paper lanterns - we bought 3 packs of 3 at Walmart. Each pack had a white, orange and purple lantern. The metal frames are included.
- String, ribbon, fishing wire or other
- Clear push pins
- Scissors
- Step stool
Although assembling lanterns is fairly easy, you’ll love these quick tips if you've never tried it before.
Directions - let’s get to work!
1. Assemble all the lanterns before you begin hanging. It will be faster and easier to do all the assembly and all the hanging as two different steps because you’ll get faster and better at both jobs as you get the hang of each task. Have your hanging string (or ribbon) handy, along with the pushpins and step stool.

2. Just tie a knot at the top of each lantern and you’re ready to go!

3. We varied the height of each lantern that didn’t require any measuring. The only thing we paid special attention to is hanging the lanterns at different heights to “fill” the wall behind with color. Don’t worry if you have artwork in the background, it will look great. Another option is to hang the lanterns in a straight line at the same height. Caution though, that would mean measuring each string carefully and would require more fuss.

Tip: The best strategy (we found) is to hang one lantern, step back, take a look at the display, and carry on with hanging the next one. Repeat. This makes it easier to gauge and correct the spacing and height.
We centered our display with the table and hung lanterns within the width of the table. Spreading them out too much won’t have as much impact. Remember, it’s all about creating a WOW focal point with your Halloween decorating.
Ta da! 
We added an orange and white plaid table runner to dress up the table, and it ties back to the lanterns nicely without taking away from the display. It really complements it well.

How much did it cost?

Warning: Open the lanterns gently; with one of ours, the thin paper was glued together and ripped in a few places when we opened it. Of course, we still used it, it’s just frustrating.

TIPS:
- We chose a white ribbon to hang our lanterns. Fishing wire completely disappeared against the white background and didn’t look as good for photography. The lanterns looked like they were glued to the wall. LOL! Just use whatever you have handy. There’s no right or wrong choice, it’s all about the look you want to achieve. If you want to add a bit of “spooky” to your display, use black string.
- About the push pins: We used clear push pins to hang the lanterns from the ceiling (they disappear against the white ceiling, white would work well too). They make a tiny little pinpoint that is barely visible when the lanterns are taken down. Clear tape would work too, the lanterns are extremely light. It’s a temporary display, we’re not looking for a permanent solution.
Need easier Halloween decorating ideas?
Happy Halloween everyone!


SHARE:
