Tips and tricks for using Hang & Level™

If you love decorating your walls then adding Hang & Level™ to your tool kit is a must. Without any calculating, find the perfect spot to hang your wall décor and mark exactly where the nail goes. No more mistake holes! There are a number of features on the picture hanging tool that make it easy to hang wall décor that is heavy, large or has two D-rings. And, it’s so easy to hang a gallery. Read on to learn some tips for getting the most out of Hang & Level, the picture hanging tool.
Hang & Level basics
Hang & Level works with all kinds of hanging hardware, including picture wire, keyhole, sawtooth and D-rings. Here are the basic steps to use Hang & Level: Hang your wall décor item on the tool. Take the tool and item to the wall. Find the spot where you want it to hang. Remove the item leaving Hang & Level on the wall and press the button to mark exactly where to put the nail. No complicated calculations. And, no more mistake holes! Watch how easy it is to use Hang & Level.
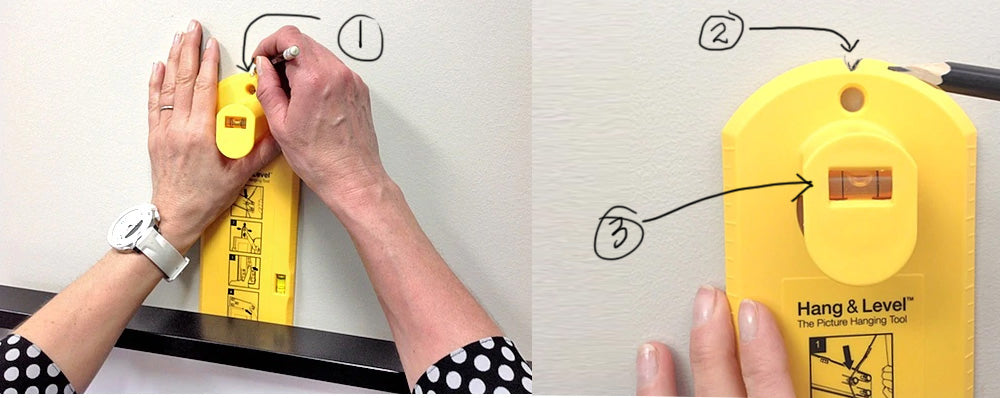
Use the top notch for heavy items
The notch on the top of Hang & Level is handy when you have an item that is just too heavy or awkward to remove from the tool by yourself. Hang your décor item on the hook, and take the item and tool to the wall. Once you’ve found the spot to hang it, make sure the tool is vertical using the level in the handle, and make a mark in the notch on the wall with a pencil. Remove both the item and tool from the wall. Return just the tool to the wall and align the notch on the tool with the pencil mark. Make sure the tool is vertical again by using the level in the handle, and just like that the tool is in the same spot as before. Push the button to mark where the nail goes. Watch this video to learn more.

Angle the tool sideways for larger items
Sometimes you have an item where the tool doesn’t clear the top of the frame, or there is something immediately above the frame, like another frame or a cabinet. In this case, if you are hanging the item on the single hook, you can simply angle the tool sideways and you’ll get the same results. Make sure to keep the tool firmly on the wall as you remove the frame from the tool, sometimes it’s easier with a helper.

Hang an item with two D-rings
There is lots of décor that comes with two D-rings, either on the top or the sides. You can still use Hang & Level to hang these items, and it works best to have a helper. To start, put one D-ring on the Hang & Level, take it to the wall and position the frame in the right spot. Leave the tool on the wall and take the picture off. Mark the spot for the first nail. Hammer in the nail and then hang the picture on it. Hang the second D-Ring on the tool, make sure your item is level and then mark the spot for the second nail.

Use the double hooks for more stability and flexibility
If you are hanging something with picture wire, you can use the double hooks system on the tool. Hanging an item using two fasteners will hang it more securely, and it allows you to adjust the position horizontally for more flexibility. In addition, when a picture is hung on two points the frame stays in place and is less likely to move. Hang the picture wire over the two hooks on Hang & Level and once you’ve found the right spot to hang the frame, push both buttons to mark where to install the two fasteners. Once the picture is hung on the wall you will be able to move it horizontally slightly without it becoming crooked.

Use the levels to get things straight
There are two levels in the Hang & Level tool. Use the level in the handle to make sure the tool is perfectly vertical. This is key if you are hanging a heavy item and need to take the tool off the wall and then replace it in the exact same spot.
The level on the side of the tool is used to make sure your artwork is hanging straight. Once your décor is hung, turn the tool on its side, place it on the top of the item and use the level to adjust it until it’s straight.

Hang a gallery with ease
Hanging multiple frames or a grouping of wall décor can be a visually stunning feature in any room. And, using Hang & Level will make the project quick and easy - without any extra holes in the wall!
For more decorating tips using Hang & Level check out these blog posts:
Step by step guide: creating the perfect gallery wall
We love designing products to make decorating easy. Click on the live chat below or email us at: questions@utrdecorating.com, and we’ll do our best to help you Create the home you love™
-The UTR Team


SHARE:
