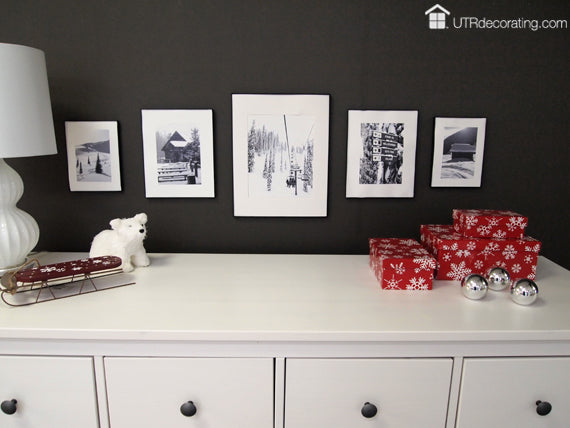
5 frames – 5 looks

You buy the perfect size of frames to frame pictures of your family, vacation or pets. When the time comes to hang them, you’re feeling confused because you don’t know where to begin. I know the feeling, that’s why I thought I’d share with you 5 different ways that I hung 5 frames above a dresser. I hope it inspires you to get your pictures up on the walls.
Facing a large blank wall can be very intimidating. In fact, some people live with bare walls for a long time because they’re either terrified of putting holes in them or because they don’t know what to hang. I’m here to help.
This is what I started with, a white bedroom dresser and a dark brown empty wall.
I love winter and I had gorgeous ski vacation pictures that I was eagerly anticipating showing off. I thought they would make the perfect vignette above this IKEA bedroom dresser, and it would give me the opportunity to enjoy them every day.
I bought different sized frames:
1 – 8×10
2 – 5×7
2 – 4×6
I printed my ski pictures in black and white and I’m glad I did because they look even better then they did when in color. Also, because they’re hanging in a bedroom, I find that they have a calming, peaceful overall effect by being in neutral tones.
Before starting to hang my frames, I played around with different scenarios on the floor to get the looks that I liked best:
Look #1: Lined up & centred with each other
- I started by hanging the largest frame, I centered it with my dresser.
- Then I centered a 5×7 on either side of the large one.
- I repeated the same steps with the smallest frames.
- I left equal spacing between each frame using Spacer Strips. You could use equal sized pieces of painter’s tape too.

Look #2: Tops lined up
- Just like in look #1, I started with the largest frame and centered it with my dresser.
- Then followed the same hanging order as above but this time I lined up all the tops.
Look #3: Bottoms lined up
- Just like in look #1 and #2, I started by hanging the largest frame, centered it with my dresser.
- Then followed the same hanging order as above except that I lined up all the bottoms instead of the tops.
Look #4: Bottom row meets the top row
- I started with the largest frame, centered it with my dresser.
- Then I hung the top frames, I centered them above the large one.
- Next, I hung the smallest ones with their tops lined up with the top of the large one.
- I kept all the spacing even using Spacer Strips.
Look #5: Freestyle
- Once again, I hung the largest frame and centered it with the middle of the dresser.
- Next, I equally distributed what went on the left and right to get a balanced look.
- The spacing between frames is all different, no measuring involved.
Note that when you hang your largest frame, make sure it’s not hanging too far away from your furniture, otherwise the entire display will end up hanging too high and disconnected from the furniture below. Your art is an extension of your furniture, so keep it relatively close to each other.
All the looks are great – the one you choose is all a matter of personal preference.
Invest in good quality frames and when you get tired of the images, simply swap them out for something else. It will help keep your walls looking fresh, and let you enjoy your pictures that otherwise might live in photo albums or on your laptop forever. By the way, it’s easy to re-hang frames in the exact same spots if you’re taking them down to switch out the pictures, you don’t have to make new holes in the walls.
So get those walls decorated, get your favourite pictures out and show them off. The holidays are the perfect excuse for that.
Which look is your favourite? 1, 2,3,4 or 5?

Liette Tousignant
Co-Founder of Under The Roof Decorating
Make sure to sign up to receive our decor and design blog posts delivered straight to your inbox.
SHARE:


